The Easiest & Simplest Way To Get Started With Zoho Recruit
The Easiest & Simplest Way To Get Started With Zoho Recruit
Are you still new to Zoho Recruit and having a hard time figuring out the app? Fret not, we're here to help you to get started in the early steps of using Zoho Recruit. In this article, you'll be learning on (1) how to add new users, (2) how to associate roles and profiles to them and (3) how to assign different profile permissions.
An additional information before we get started! You must be aware that only users who have the "Manage Users" permission in their profile can have the access to look and manage the list of users in Zoho Recruit, for instance like adding users, changing user information, and see which apps and add-on are active for each user.
(1) HOW TO ADD NEW USERS
(1) HOW TO ADD NEW USERS
The first point of the step is how to add new users to the app Zoho Recruit. Quite simple really. Just follow these compulsory steps foremost, then you are good to go.
Name, email address, role and profile must be added by The Administrator to create the user's profile. An email invitation will be sent automatically to the user's email as provided by the administrator once added. Other details such as numbers, address, website and etc. can also be filled after adding the user. The user can now accept the invitation by clicking the "Access" link within 7 days of receiving it via email.
Afterwards, there are two different sequences that need to be determined the users position to proceed with the process - user is new to Zoho and does not have an account - and - user already has an account with Zoho but does not have a Zoho Recruit account.
So if you are completely new to Zoho, meaning you do not have both Zoho and Zoho Recruit accounts, then you are required to sign up and create an account with Zoho. How? By clicking the access link in the email, the user will be redirected to the sign-up page. Once created, click the Continue signing button. The user then has to confirm the email address by accessing the link that has been sent in the Confirmation email.
If the user already has an account with Zoho, but doesn't have a Zoho Recruit account however, then the user should only click the Continue Signing in button after accessing the link in the email. The user will be logged into the Zoho Recruit account that is associated with the company's account once accessing.
Now when that's done, you can now add users. First of all, you are required to log into Zoho Recruit with the Administrator privileges. You can also access this feature if you have permission to Manage Users.
Next is to go Setup > Users & Control > Users. Here you can find the Users Page is click +Add New User.
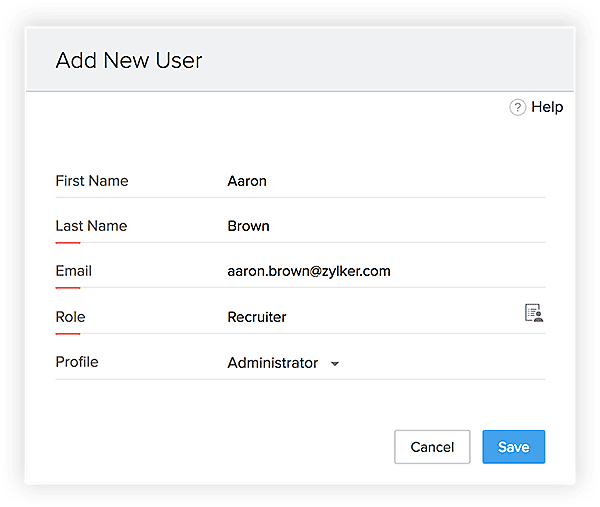
On this page, it is required for you to enter the required details such as Full Name, Email, Role, Profile and Territory.
Finish? Click Save. The system will send an invitation to the user's email address. and only when the user accepts the invitation, will the status of the user change to Confirmed.
(2) HOW TO ASSOCIATE ROLES AND PROFILES TO USERS
(2) HOW TO ASSOCIATE ROLES AND PROFILES TO USERS
Here you need to identify the user either they are categorized in cooperate or staffing section. These are the lists of roles and profiles that you can find along the way;
Staffing Edition
Roles
Recruiter Admin - Can view all organizational data, irrespective of data sharing rules and module access.
Recruiter - Can view data that belongs to them but not other users (If modules are set to private)
Guest - Can view all organizational data (Similar to admins)
Interviewer - Only able to see data created by or related to them. If the user is the assigned interviewer, then they can view the candidate record and the job opening associated with the interview.
Client Administrator -[Client portal] Can view all job openings related to their Client ID from their portal account
Client Interviewer - [Client portal] Can view job openings under their Client ID for which they are the assigned interviewer
Profiles
Administrator - Complete control over hierarchy setup and data permissions across the organization
Standard - Can manage end-to-end hiring processes in the organization
Guest - Can only make interview decisions scheduled for them and log activities (notes) to any data
Interviewer - Can only make interview decisions scheduled to them
Client Administrator - [Client portal] Can create job openings and submit feedback (notes) for all records
Client Interviewer - [Client portal] Can submit feedback for the records assigned to them
Corporate Edition
Roles
Recruiter Admin - view all organizational data irrespective of data sharing rules and module access
Recruiter - Can view data that belongs to them but not other users (if modules are set to private)
Hiring Manager - Can view candidate and job opening data, access referrals, and submit interview feedback (if they are an interviewer)
Employee - Can view referrals and notes
Profiles
Administrator - Complete control over hierarchy setup and data permissions across the organization
Standard - Can manage end-to-end hiring processes in the organization
Hiring Manager - Can create jobs, review submitted candidates, and add notes
Employee - Can create referrals and submit interview feedback (if they are part of the interview process).
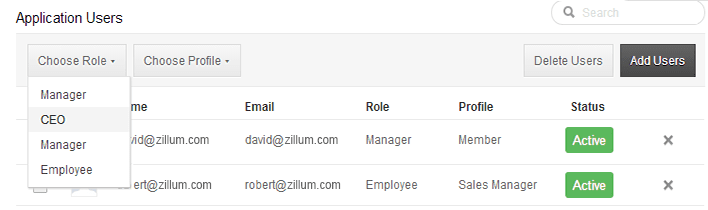
Have you identified the user's roles and profile? If yes, now you can assign the respective roles in your organization. If you happen to have access to the Administrator profile, you will also have access to all the data irrespective of the role assigned to the user. To assign roles to the users, follow these steps;
Navigate to the Settings page.
Select Users & Permissions.
Select Users tab. The Users page appears.
Select the required user.
Select the specific Role from the Choose Role drop-down. A confirmation dialog is displayed with Yes/No button.
Click Yes to update the changes.
That's it! As easy as ABC.
(3) HOW TO ASSIGN DIFFERENT PROFILE PERMISSIONS.
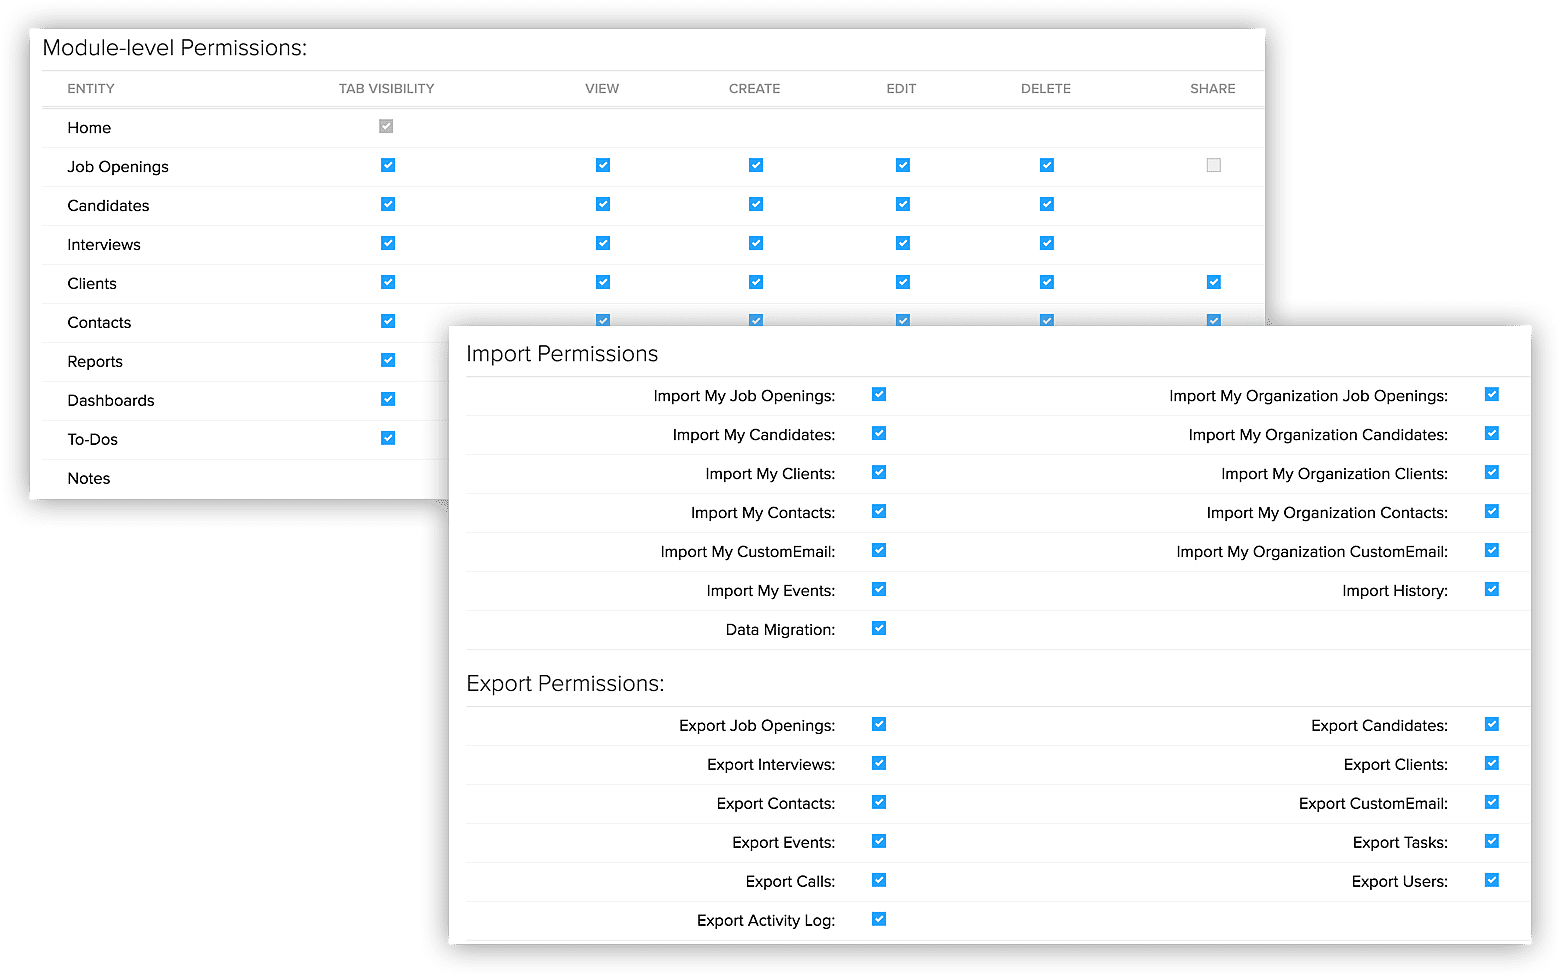
The last step in this how-to article is assigning different profile permissions to the new added users. Profiles in Zoho Recruit help you define permissions for a set of users. For example, the permissions required for a person from the Sales team might be different from the permissions required by a person in the Marketing team.
There are two profile permissions that are provided as default. You can only change the permissions for the module and no other customization is possible. The two default profiles are Administrator Profile - has access to all the features in the Zoho Recruit account. The other is Standard Profile - This profile has limited access to the features in Zoho Recruit account.
To make the process of managing profile permissions easier, the permissions have been grouped in such a way that you will have no problem in customizing them as needed. You can enable or disable permission in a single click rather than having to go through the hassle of disabling each checkbox. With instant saving, you wouldn't have to worry if you lose any of your progress.
Basic permissions
Advanced permissions
Permissions like Import/Export, Send Email, Tool and other advanced permissions can be enabled only when their pre-requisite is enabled. For instance, a user can send Mass Email only when Send Email permission has been enabled for that profile. This makes sure that users can't exceed their permissions.
Import / Export Permissions
| Permission | Description | Required Permission | Supported Module |
| Import Own Records | Import records owned by current user. | Create | Candidates, Clients, Contacts, Job Openings, Products, Campaigns, Custom Modules. |
| Import Organization Records | Import all records owned by the users in the organization. | Create | Candidates, Clients, Contacts, Job Openings, Products, Campaigns, Custom Modules. |
| Export | Export records from each module. | View | Candidates, Clients, Contacts, Job Openings, Products, Campaigns, Notes, Forecasts and Custom Modules. |
Send email permissions
Permission | Description | Required Permission | Supported Modules |
| Send Email | Modules from which you can send an email. | ||
Tool Permissions
| Permission | Description | Required Permission | Supported Modules |
| Mass Update | Update several records at once. | Edit | Candidates, Clients, Contacts, Job Openings, Activities, Campaigns. |
| Mass Delete | Delete several records at once. | Delete | Candidates, Clients, Contacts, Job Openings, Campaigns. |
| Change Owner | Change the owner of a record. | View | Candidates, Contacts, Clients, Job Openings, Campaigns, Activities, Custom Modules |
| Mass Transfer | Transfer records from one user to another based on a criterion. | Change Owner | Candidates, Clients, Contacts, Job Openings, Campaigns |
| Convert | Convert a record from one module to another. For example, converting a Lead to Contact | View | Candidates. |
Other Permissions
| Permission | Description | Required Permission | Supported Modules |
| Print View | View all List view records in a module in the printable mode. | View | Candidates, Contacts, Clients, Job Openings, Campaigns, Activities, Custom Modules. |
| Sheet View | View, add and update records from the module using Spreadsheet. | Create and Edit | Candidates, Contacts, Clients, Job Openings, Campaigns, Custom Modules. |
| Find and Merge | Find and merge the duplicate records. | Edit | Candidates, Clients, Contacts |
| Manage Custom List View | Create custom list views. | View | All Modules. |
Admin Level Permissions
| Permission | Description |
| User Management | Permission to manage users, roles, profiles, groups, and data sharing. |
| Modules Customization | Customize Modules, Tab Groups, Web Tabs, Fields & Links, Layouts, Related Lists, and Business Card View. |
Email & Templates
| Permission | Description |
| Email & Chat Settings | Manage BCC Dropbox, Mail Integration and Zoho Chat bar. |
| Manage Templates | Manage Email, Inventory and Mail Merge templates. |
Automation
| Permission | Description | Supported Modules |
| Manage Workflow | Create workflow rules and associate workflow alerts, tasks, field updates, webhooks, custom functions and manage the approval process with them. | All Modules. |
| Assignment Rules | Create assignment rules to automatically assign the ownership of the records that are imported or generated from web forms. | Candidates, Contacts, and Custom Modules. |
Webform
| Permission | Description | Supported Modules |
| Manage Webform | Design and publish web forms in order to collect customer/visitor data. | Candidates, Contacts, and Custom Modules. |
| Approval | Specify the rule criteria, the approval authority and also actions that need to be carried out on approval or rejection. | Candidates, Contacts, and Custom Modules. |
Data Administration
| Permission | Description |
| Migrate data from other ATS | Enable the ability to migrate data from other ATS. |
| Import History | View the import history of modules. |
| View Storage Details | View the storage details of the account. |
Extension Permissions
In this section will allow you to define permissions for Extension, Zoho Recruit API and also Social Settings. These permissions deal with the communication of Zoho Recruit with third party integrations.
Zoho
| Permission | Description |
| Phone Bridge | Mange incoming and outgoing calls from within Zoho Recruit. |
| Docs | Create and collaborate your documents inside Zoho Recruit. |
| Reports | Track your colleagues' and applicants' progress with Advanced Recruit Analytics. |
| No more juggling tabs. Get your mails from inside your ATS. | |
| People | Convert a hired candidate into an employee in a single click. |
| Permission | Description |
| Sync with Google Contact | To synchronize contacts between Google contact and Zoho Recruit. |
| Sync with Google Calendar | To synchronize Google and Zoho Recruit calendars. |
Zoho Recruit API
| Permission | Description |
| Zoho Recruit API | Access the Zoho Recruit API for integrating Recruit modules with third-party applications such as accounting, ERP, e-commerce, self-service portals, and others |
Social
| Permission | Description |
| Social Tab | Enable the social tab for the user. |
| Add Social Profiles in record | This needs to be enabled for the user to integrate their social accounts into Recruit. |
And we are done! We hope you find this article helpful. If you have any questions or request, kindly email us at marketing@aplikasi.us. Yes, we do accept requests from our readers! Need more "How-To" materials? Just email us!
Interested to know more about what Zoho Recruit can offer? You can also click below to go straight to our Whatsapp for further enggaement.